My Pacific Electric Express Yard project will need great looking and great running models of PE box motors in order to come to life.
As fortune would have it, there are some excellent starting points for such great looking and running models of PE rolling stock. ‘Starting Points’ is doing a lot of work here: available PE models are all but antiques that require significant electrical, mechanical, and finishing effort to bring up to 21st century modeling expectations.
Pacific Electric, like the Pennsylvania Railroad or Rio Grande narrow gauge, was particularly favored by model railroad manufacturers earlier in the hobby’s history. The lion’s share of HO PE rolling stock models were produced in the 50s, 60s, and early 70s, by Suydam (pronounced ‘sue-dum’), a Southern California-based company that manufactured craftsman-style structure kits of PE lineside structures and imported brass rolling stock models of PE and other traction prototypes from Japan. A few other model traction houses also imported brass PE models as late as the early 90s.

My first exposure to Suydam’s PE products was via The Complete Book of Model Railroading by David Sutton, copies of which were in both my middle school and town libraries. Sutton’s book included lots of photos of Suydam cars. When Model Railroader, Railroad Model Craftsman, and Railroad Modeler magazines came to my attention, I noticed ads hawking Suydam models. My first visits to hobby shops in the Chicago area revealed shelves of Suydam’s yellow structure kits. Suydam, in short, was everywhere at the dawn of my traction model railroading interest.
Even during their heyday from the late 50s through the mid 90s, brass model trains were highly sought after, but nonetheless reputed to be expensive display or shelf queens—accurate, detailed models of specific prototypes, often the only available model for many prototype subjects, and typically mediocre or even poor performers.
Addressing the operational shortcomings of old brass trains has long been an art unto itself. Fine tuning the performance of brass steam locomotives and complicated drive arrangements—low-profile and under-floor traction truck drives count as complicated—was difficult when the models were current 40-60 years ago. These challenges tend to worsen with age: the demands of modern DCC necessitates difficult isolation and/or replacement of outdated open-frame motors; replacement parts are difficult and expensive to source; insulation, bearings, gears, and motor magnets deteriorate with time; and even optimally performing brass models perform poorly in comparison to smooth, quiet modern drives. Often, the solution is outright replacement or reconstruction of rickety old brass motors and mechanisms.
In addition to their usually lamentable running qualities, the detail fidelity and construction of brass model trains, especially older examples from the 50s and 60s, sometimes fall short of current appearance standards. Rivets, for example, might be oversized. Cabs and car sides are likely fabricated from thicker-than-scale brass sheet stock. Underfloor detail is likely to be simplified and crude, typically without piping or rods. Decidedly non-scale motors, wires, gears, screws might be on proud, visible display.
The other inescapable appearance problem with brass models was their lack of paint. Brass models usually were sold in their bare brass glory and needed to be painted and finished after purchase. Judging by the vast majority of pre-owned, unpainted brass models currently on offer, it’s evident very few of them were ever painted. There’s a reason for that: painting and finishing brass models has always been particularly challenging, requiring dissassembly, cleaning and preparation, and application of metal-compatible paint.
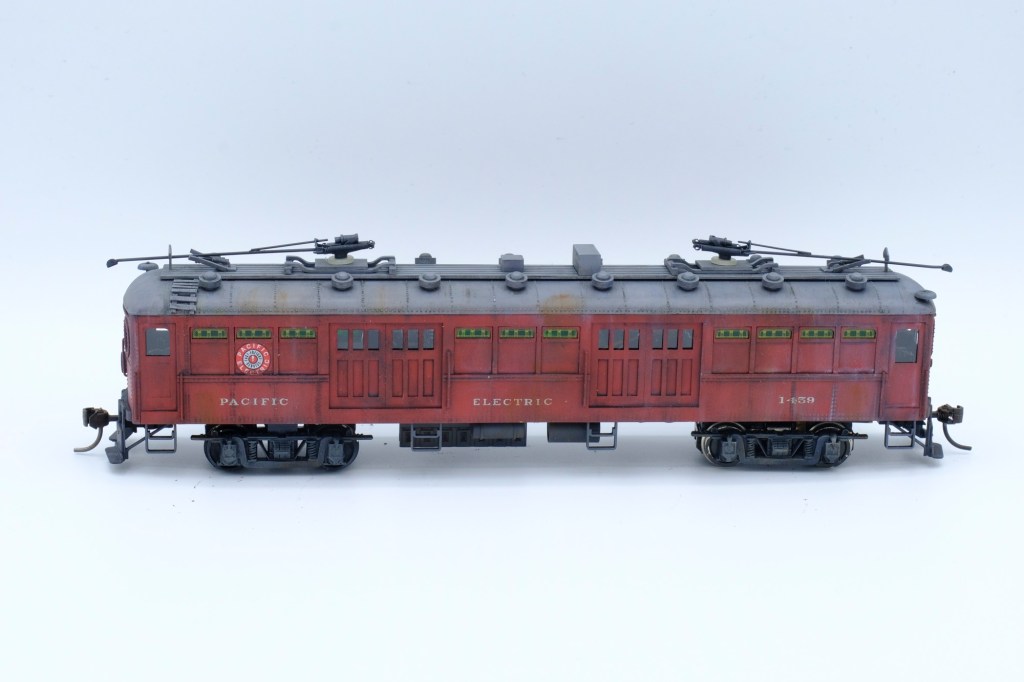
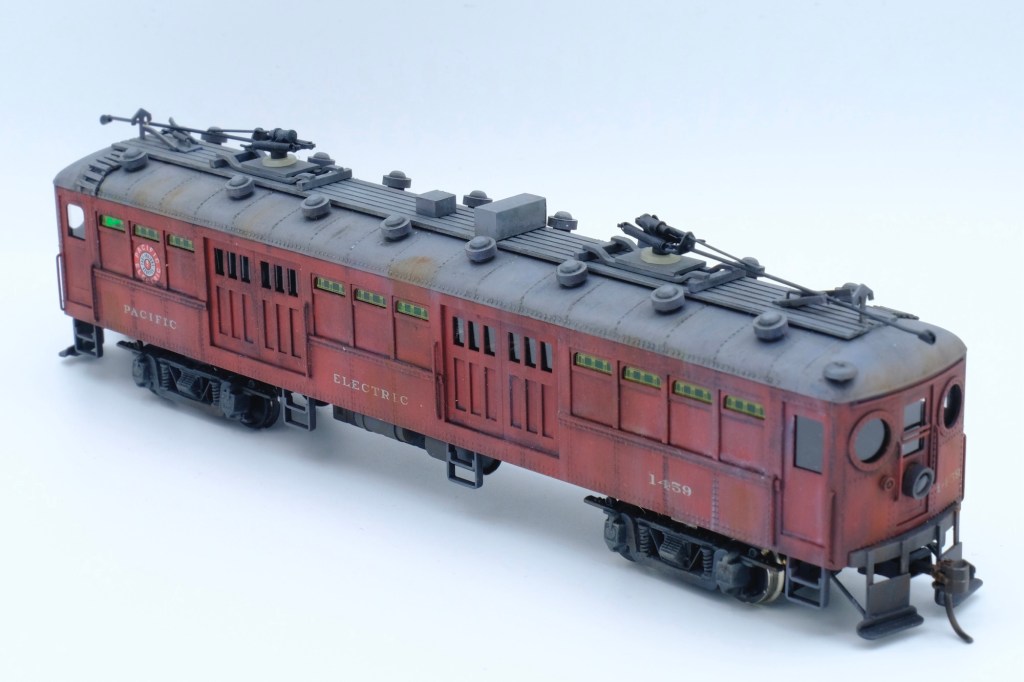
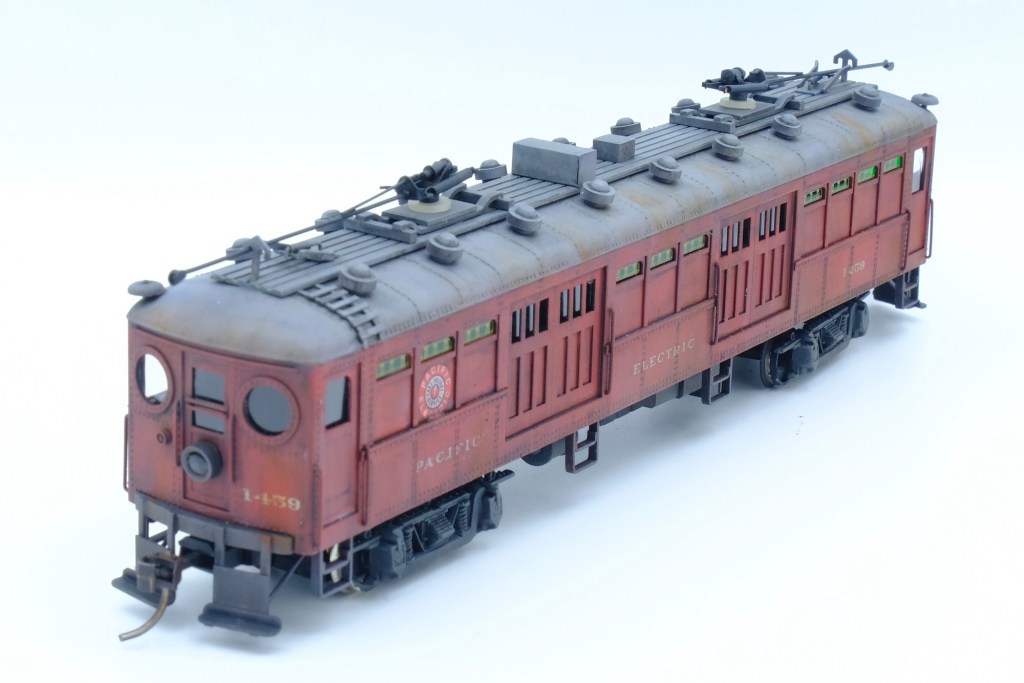
Before fully committing to the PE Express Yard project, I wanted to complete at least one operating box motor as a proof of concept, demonstrating that modernizing and upgrading Suydam’s classic brass models to 21st century operational and appearance standards was possible and hopefully, practical and repeatable. I selected a particularly interesting car for this test build, Suydam’s rendering of PE #1459, a converted coach with visually interesting side details, including stained glass transom windows that add a dash of color.
The model I acquired dated from the mid- or late- 60s and included the original Suydam instruction leaflet, clear and printed stained glass acetate glazing material, and remarkably, decals. It was in overall good shape visually, with manageable tarnish and grime and no damaged or broken parts. The trolley poles, which are often bent on such vintage models, were in excellent condition. The model operated as expected: barely, and only in ‘on’ and ‘off’ speeds, while producing a nostalgically charming ozone smell.
Suydam’s cars typically were equipped with an open-frame motor and so-called ‘spring belt’ drive without a flywheel. The motor shaft, equipped with a knurled pulley wheel, turns a belt made from a long, tightly-wound metal spring. The spring belt engaged another knurled pulley in the single drive truck, which in turn rotated worms engaged with worm gears on the drive axles. The spring belt could flex with the swing and pitch of of the powered truck. This drive arrangement is crude by today’s standards but it was functional and more or less reliable, though not particularly smooth. Spring belt drives are generally finicky, and performance can vary wildly from model to model.
Remediating a spring belt drive can be vexing. Tinkering with the length of spring belt to adjust its relative tension is the principal way of ‘tuning’ its performance, as is replacing the open frame motor.
Another factor in determining how best to address drive issues in these old Suydam cars is how they are wired. I intend to use DCC for the Express Yard, which requires that the motor be completely isolated from track pickup. As was typical for 50s-70s brass traction models, track pickup used one truck for pickup off one rail, and the other truck for pickup off the opposite rail, with the motor grounded to the model frame. In other words, the Suydam motor is not isolated and not suitable for DCC, in addition to having high, erratic current draw that would likely wreck most DCC decoders.
Some modelers report success with adding additional pickup wipers to the Suydam wheels and replacing the stock open frame motor with a modern can-type motor equipped with flywheels, while keeping the original spring drive transmission. Outright replacement of the Suydam motor and power truck with a more modern alternative, such as a Northwest Short Line Stanton, Tenshodo T-Evolution, or a Hollywood Foundry Bull Ant, is yet another the approach to repowering these cars.
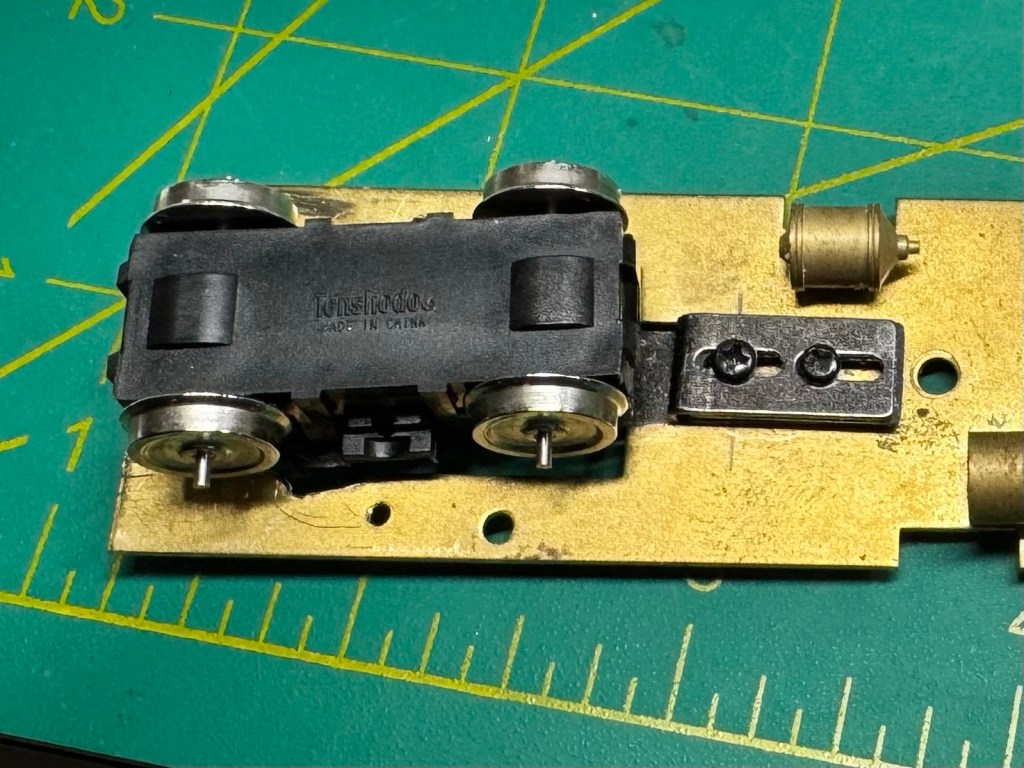
For PE 1459, I opted to replace the old motor and spring belt drive outright with a modern, self-contained, low current draw power truck, a Tenshodo T-Evolution. Out of the box, the Tenshodo truck picks up from both rails and a simple snip of the copper conductors isolates the motor from track pickup for connection to a DCC decoder.
I purchased my Tenshodo T-Evolution truck from an EBay vendor in Japan. The truck came packaged with Japanese language instructions, a bolster tongue, spacers, screws and nuts, weights, and truck mounting brackets.
By using Google translate to read the instructions and studying their diagrams, I sorted out how to use the accompanying hardware to mount the the truck to the Suydam floor. The bolster tongue has an offset which, in combination with two of the provided spacers, sets the truck at the correct height.
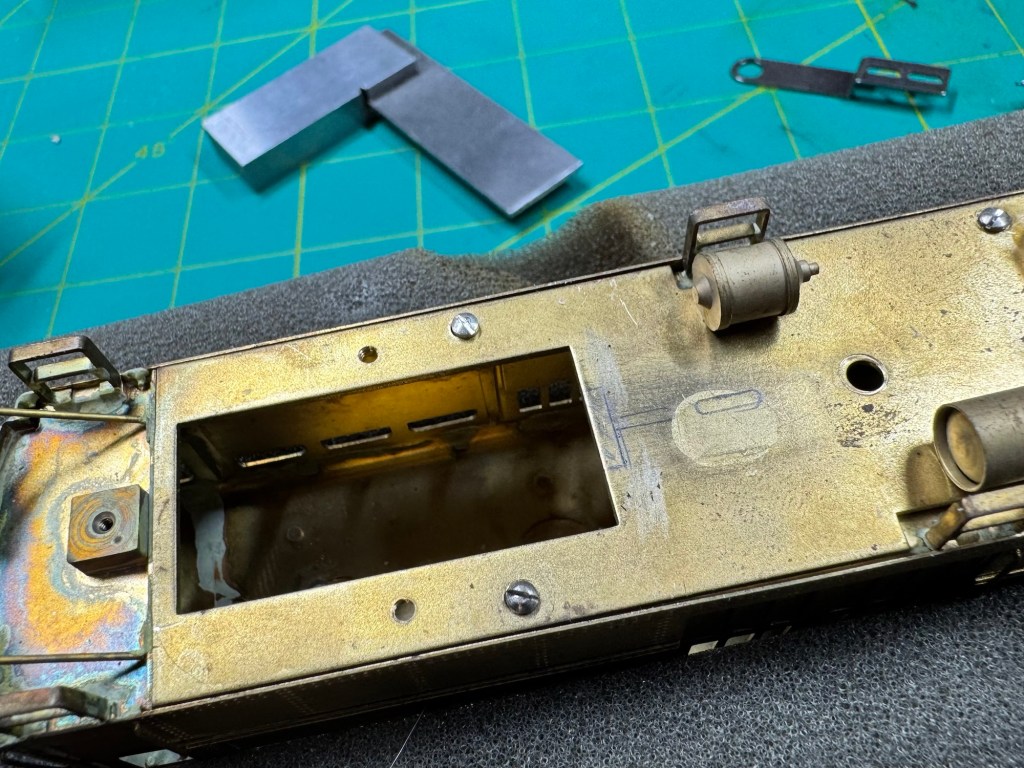
The original Suydam power truck and its saddle-shaped mounting bolster was removed and disassembled. The truck sideframes were unsoldered from the power truck, with their backsides cleaned and filed flat so that they could be epoxied squarely to the truck mounting brackets later.
With the original truck, motor, and saddle bolster removed, a metal nibbler and mill file was used to expand the rectangular truck-mounting hole in the floor to a butterfly or bow-tie shape to allow the raised Tenshodo truck top to swing appropriately. An additional rectangular extension of the butterfly shaped floor hole was cut and filed to the exact width of the provided bolster tongue, so that the new truck would pivot at the exact location of the original Suydam bolster saddle, a location discernible by the original bolster saddle mounting holes.
With the truck mounted, and before I disassembled the truck to snip its internal wiring and solder new motor leads for DCC, I test ran the new truck mounted on the Suydam floor on DC. I added approximately 3 ounces of stick-on weights to to the floor to improve its traction and pickup contact.
Once I was satisfied that the truck could swing adequately and the its performance was satisfactory, I disassembled the truck, snipped its internal copper conductor strips, and soldered appropriately colored leads to the motor lead tags. The new motor leads were threaded through holes that had been molded into the truck casing by Tenshodo in anticipation of this modification.

I used a ESU LokPilot V5.0 DCC decoder with a PowerPack (ESU’s proprietary version of a keep-alive capacitor—a veritable miracle performance enhancement for models with rigid trucks, short wheel bases, and/or light weight). The LokPilot decoder plugs into on a Nixtrains V5B Decoder Buddy, which acts as a kind of ‘motherboard’ for the box motor. The Decoder Buddy facilitates easy swap-out of decoder, separate PowerPack, and headlight LEDs in the event of failure (somewhat of a likelihood, in my experience) thanks to the decoder socket and large, well-labeled soldering pads for LEDs, motor, and track pickup leads. The Decoder Buddy also has resistors pre-installed for the LED outputs.
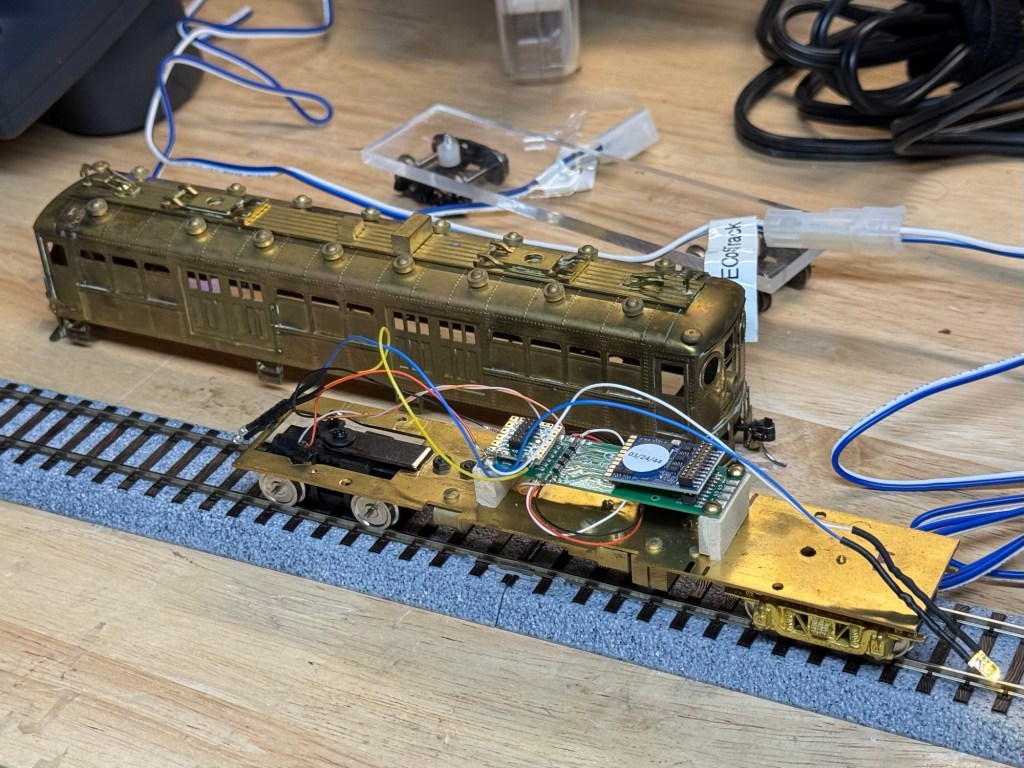
The Decoder Buddy is screwed to stripwood blocks attached to the box motor floor. The result is a tidy-ish arrangement intended to support trouble-free operation and maintenance.
The model was tested for DCC operation, and then fitted with Kadee #26 couplers as recommended by Kadee. I did not use Kadee’s associated #454 radial swing adapter because of PE 1459’s freight footboards, which block radial coupler motion. Box motors like PE 1459 could and did move a box car or two during operations, so I wanted functional couplers on the model. Suydam’s coupler mounting pads are drilled and tapped for 2mm metric screws but are set back impossibly far from the car ends for anything other than a super long shanked coupler. I fashioned mounts for the assembled couplers from a short length of 1/4” x .020” brass strip. One end of the mount is screwed into the existing coupler mounting pad with a 2mm screw, with the other end of mount secured to the draft gear box with a 2/56 screw. This arrangement resulted—miraculously!—in perfect alignment with the Kadee coupler height gauge.
With the model operational, I turned to its finish. I was eager to see how its occasionally coarse-seeming detail would appear under primer, paint, decals, and weathering.
The model was completely disassembled, and its power truck and mother board set aside so that the body, floor, and various loose bits like the power truck sideframes and trolley polls could be cleaned and prepped for primer and paint.
The model received a thorough soap and water cleaning and scrubbing with a stiff tooth brush. Stubborn areas of tarnish and discoloration were carefully rubbed out with steel wool. Most of the model was soaked overnight in a strong paint prep solvent intended as a safer alternative to acetone or methyl-ethyl-ketone. The unpowered truck sideframes were carefully scrubbed but the truck was explicitly not dunked in solvent like most of the other major components.
The wet, solvent-soaked components were scrubbed yet again with the stiff scrub brush, given another soapy bath bath, rinsed, and allowed to dry overnight.
Hobby paints that play well with metal were the norm back when this Suydam model was new stock in a local hobby shop. However, today’s hobby paint market is dominated by acrylics, largely in response to environmental and safety laws and shifting modeler preferences. Forty or fifty years ago, toluene- and xylene-based lacquers such as Floquil or Scalecoat were available in virtually every hobby shop, and these strong-smelling, robust paints were formulated for maximum adhesion and durability on metal and wood models. In contrast, today’s prevalent acrylic paints adhere poorly to metal and are also extremely sensitive to surface contaminants like finger oils and metal oxidation (AKA tarnish on brass).

After much consideration and research, my usual GSI Creos Black Mr. Surfacer Primer was sprayed on, thinned with straight lacquer thinner (instead of my ‘usual’, GSI Creos Mr. Leveling Thinner) to improve adhesion to metal, per a tip from John “Dr. Strangebrush” Miller of Model Paint Solutions. Other approaches I considered were Tamiya’s Fine Surface Primer out of the rattle can, an approach well proven by my traction and cameo layout fellow traveler Trevor Marshall, and Rustoleum black primer.
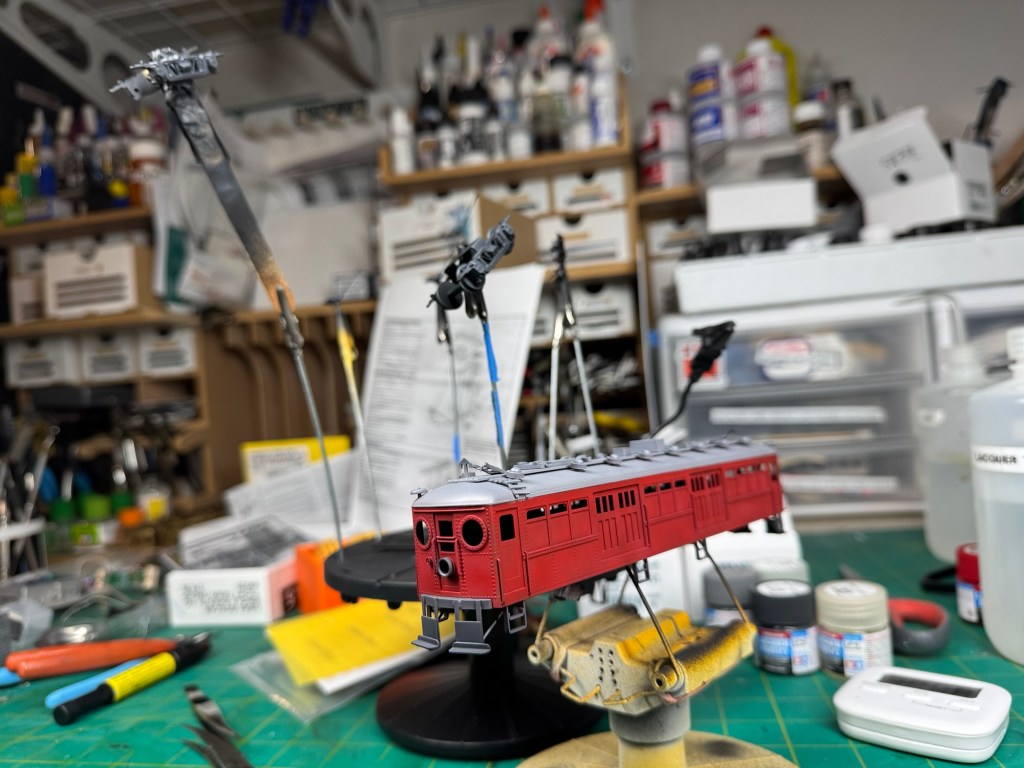
The application of black Mr. Surfacer primer to PE 1459 was positive and electrifying (pun partially intended). At last, the model was coming together, and no longer looking uncannily abstract in dirty, mottled brass.
Modern lacquers like Tamiya LP and AK Real Colors approach the performance of the 20th century Floquil and Scalecoat products, and seemed like an obvious choice for PE 1459. They are durable, and work well when applied over a high-adhesion, solvent-based primer, like Mr. Surfacer.

Unfortunately Tamiya LP and AK Real do not offer railroad specific colors, though both lines include plenty of colors usable for model railroading. For PE 1459, I used Tamiya LP79 Flat Red for the ends and sides, Tamiya LP34 IJN Gray for the roof, and AK Real 22 Rubber black for the pilots, trucks, and underframe.
As the colors went on, my concerns about whether details were too coarse or overscale were allayed. The underbody in particular was a worry, as it is all but silhouettes and outlines of the various compressors, resistor banks, and air tanks, with only basic detail. The floor assembly looked acceptable, or better, once primed and painted.
In preparation for decals and weathering, I applied GSI Creos GX100 gloss, which is a very tough and durable clear coat.
Microscale’s 87-589 sheet provided all the markings for PE 1459. They went on easily, and responded well to Micro Set and Sol, as expected. The round PE heralds are a very tight fit into the blanked out coach window spaces; a judicious, hair-width trim of the top and bottom of the heralds will make them fit perfectly. Once dry, the decals were sealed with another coat of GX100 gloss.
Reference photos of PE 1459—and there are some very good ones in blazing Kodachrome color, as well as the more customary black-and-whites—show that it was a dirty, dirty beast. Express motors did not get the cleaning and maintenance love lavished on PE coaches over most of their service lives, so the model was liberally treated to my usual battery of pinwashes, oil dot filters, and a few rust and stain effects, especially on the roof and underbody. A final step was a coat of clear matte varnish.
In preparation for final reassembly, glazing was installed. I was pleased with the finish of PE 1459 so far, but bothered by the soulless zombified look of the glazeless model—unglazed windows in locos, cabooses, passenger cars, and other rolling stock are a particularly acute pet peeve of mine. First I installed the green stained glass transoms, which I feared would either disintegrate or react poorly to modern paint and glue after 60 or so years. Gratefully, the transoms installed by the numbers, secured with gentle, clear Micro Kristal Kleer.
For the remaining clear windows, I followed a recommendation from Trevor Marshall to use microscope slide cover glass, which stays flat, resists scratches, and reflects like real glass. I was able to quickly get the hang of cutting the slide glass material with a diamond-tipped scriber and straight edge, reaching them up into the car body, and securing them with Micro Krystal Kleer. I intend to use this ‘real glass’ technique for a variety of future modeling projects.
As a final step prior to closing up the model, the LEDs were set and cemented into the headlight openings with Micro Kristal Kleer. Once dried overnight, more Micro Kristal Kleer was applied to form a uniform headlight lens.
Final assembly, testing, and DCC programming was eminently gratifying as months of effort, trial and error, and workbench in disarray gave way to a handsome, hefty model. With the model in its final weight and balance configuration, I used an ESU LokProgrammer to tune PE 1459’s Back EMF setting and set a low speed curve. With these adjustments applied, the model moves gracefully at low speeds—all it will ever be asked to do on the tiny Express Yard.
Most railroad modeling ideas benefit from thorough testing prior to fully committing—especially if the modeling idea is critical or indispensable to the overall project. And lessons should be learned for future models. Indeed, PE 1459 will be joined by half-dozen or so contemporaries over time; a couple of ‘Blimp’ express cars are already on hand, as well as various other steel- and wood-sided PE box motors and combines. While I’m satisfied with how PE 1459 worked out, future Express Yard box motors and combine projects might incorporate some changes:
- Current pick ups on the non-driving trucks—more pickup is always better.
- Possible use of alternative power trucks, with the goal of using a large motor with a large flywheel mounted on the floor instead of a small truck mounted motor as used on the Tenshodo, NWSL, and Hollywood Foundry trucks; perhaps a Bowser or similar power truck?
- Possible alternative decoders: ESU LokPilot decoders have excellent programming features but the PowerPack capacitor accessory is somewhat awkward, and also might become unavailable or exorbitantly expensive as a result of new tariffs.
- Special, high-adherence primers for metal, likely not hobby products but media intended for automotive or industry applications.
- More thorough metal prepartion, particularly soda or grit blasting, perhaps alternative solvent treatment.
Pacific Electric 1459 did require significant effort and some advanced modeling to finish, but the overall result was worthwhile. I am confident that its next sibling project will progress much more quickly now that I have worked through the pitfalls of modernizing a Suydam model. And it proved to be a significant successful milestone for the PE Express Yard Project.
Highball, as the dirt-burning steam railroad folk would say!

Leave a reply to Mark Cancel reply