Nearly all railroad models currently produced are offered completely finished. There are precious few model railroad kits in current production, and fewer yet produced in injection molded styrene—in other words, just a few model railroad kits that assemble like scale plastic model kits.
Tichy Train Group more or less has a monopoly (a very tiny monopoly, to be sure) on injection styrene rolling stock kits that build more or less like plastic model kits. Tichy’s tooling was developed over 30 years ago by the Gould Company, back when model railroad kit building and craftsmanship was still in vogue. Gould’s innovation in the 80s and early 90s was its liberal use of then-state-of-the-art fine molding of styrene to produce a ‘craftsman’ kit that required significant assembly, painting, and decaling—not unlike today’s plastic models of airplanes, automobiles, or tanks.
From the 60s through the 90s, mainstream train models tended to be either ready-to-run finished models, or simple, prepainted kits. Prepainted kits from Athearn and MDC Roundhouse and RTR trains cars and locomotives coexisted with, and eventually supplanted, so-called craftsman model railroad kits. Craftsman car kits consisting of metal and wood parts, with aftermarket trucks (wheels) and couplers sold separately, traced their lineage back to the beginnings of the model railroad hobby in the 30’s.
Plastics and resins found their way into craftsman train kits meaningfully in the 70s and 80s, with Grandt Line, Gould, and others introducing injection molded kits that required much of the skill needed to complete old-school wood-and-metal car kits, including painting and decaling. Gould and Grandt Line injection styrene kits (and a few others) proved a relatively short fork in the road in the evolution of craftsman model railroad kits, with very few new injection styrene craftsman kits produced after an initial period of productivity and innovation in the 70s and 80s.
Resin, meanwhile, has since become the dominant medium for short-run craftsman model train cars—with its lower tooling costs and production rates, resin has proven a better match for the craftsman model railroad kit marketplace, for which runs in the dozens or hundreds units more than meet demand. Injection styrene tooling, in contrast, pays off in runs in the thousands of units. High quality 3D printing is now poised to match and eventually surpass resin molding.
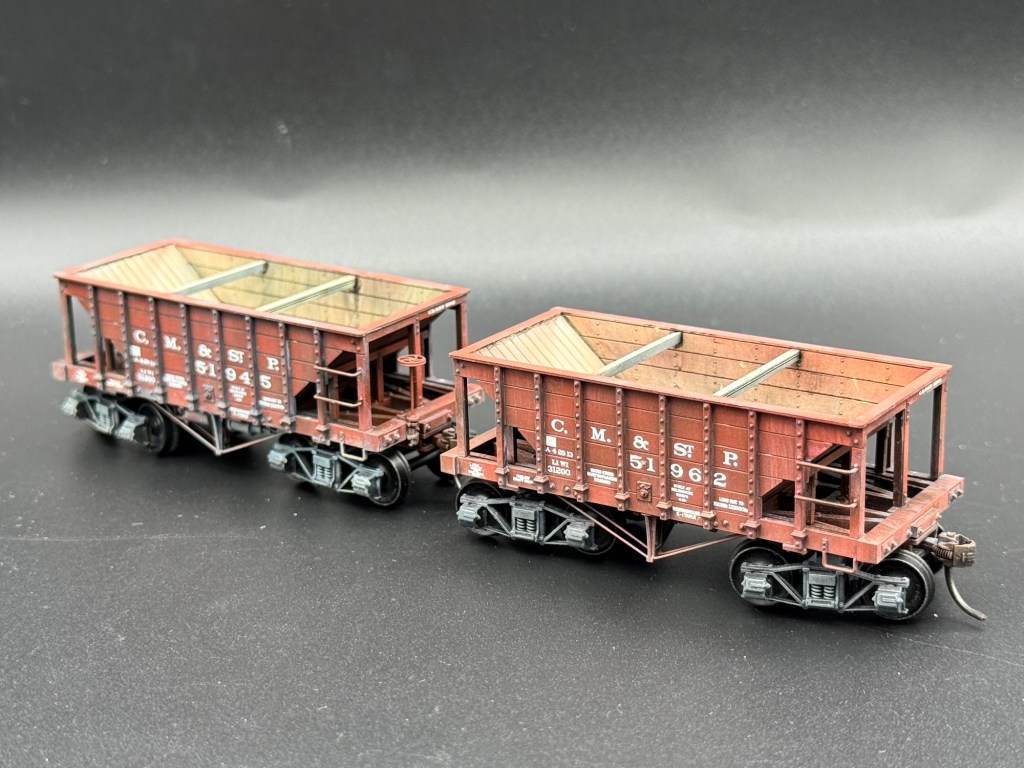
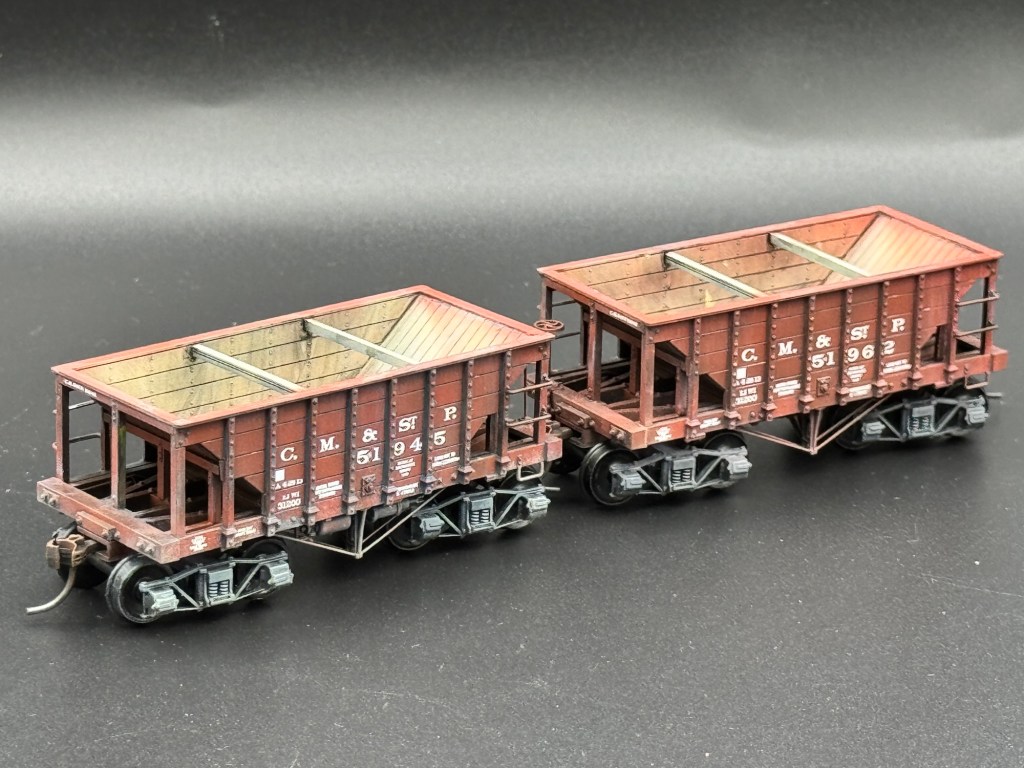
Back to the project at hand: this injection-molded Tichy ore car kit originated as a Gould product. While the tooling is generally on a par with current injection molding found in plastic model kits, there is some evidence of tool wear, with modest but manageable flash and mold seams. The sprues are also a bit of a jumble, and not a neat rectangle with sequentially numbered parts as found in most current injection molded styrene scale model kits. However, textures such as wood grain are rendered beautfully, as are delicate details like the brake wheels.
Some features of the kit, however, definitely hark back to craftsman kits of yore. Drilling, and lots of it, is expected, so a pin vise and a set of high-numbered bits are a must.
The instructions are also a test of logic and spatial reasoning—these are not Wingnut Wings or Tamiya instructions with ample indications of parts alignment and clear illustrations. Instead, referring to included drawings is often the only indication of correct alignment or orientation. The instructions also must be read and understood in whole to prevent having to go back to undo or adjust a previous step. As is typical with older model railroad kits with hand-me-down tooling, the instructions also suffer from multi-generational reproduction—these are copies of copies of copies, and it shows.
Happily, the cars assemble well. The trickiest part of the build is bending and threading the provided phosphor bronze wire into truss rods. The delicate side grab irons, molded in styrene, also demand delicate, respectful treatment.
The arch bar style trucks require some care in construction; their near-scale cross-section structure is easy to bend and distort. Some modelers may want to replace them outright with metal trucks from Kadee, if only for the modest additional weight.
Speaking of weight, the only way I could see to meaningfully add weight for more reliable operation would be a real stone load—the faithful scale reproduction of these cars’ timber construction doesn’t leave many nooks or crannies for additional weight. I added Kadee #58 couplers with knuckle detail.
The overhang of slope sheets and bracing make for some tricky painting, but I managed by priming in Mr. Surfacer Black. The instructions suggest painting these areas before assembly, but I wanted my cars to be sturdy and stuck together with with uniformly strong styrene cement. Prepainting would have necessitated use of tricky CA cement.
Painting forced me to acknowledge that model railroad-specific paints are currently all but out of the mainstream hobby supply market. There are a few narrowly distributed brands of paint, like Tru Colors, that offer railroad-specific colors like the specified box car red. I opted instead for Tamiya LP paints, which are tough and readily available. I used Tamiya LP Buff for the insides of the hoppers, to represent bare or worn wood, and Tamiya LP Hull Red, which seemed close enough to box car red, for the top rails, sides, and ends, without much regard for overspray on to the couplers or car interiors. Trucks and under sides were painted Tamiya LP Tire Black, a worthy stand-in for Floquil or Polly S grimy black. The colors were sprayed on ‘small’ at low pressure, building up color in clouds and swirls, which provides tonal variation and foundation for later weathering techniques. A coat of Alclad Aquagloss laid a foundation for decals and weathering.
The decals, by the way, are sold separately from the ore car kits by Tichy. The prototype cars served on the Milwaukee Road (AKA Chicago, Milwaukee, and St. Paul, CM&StP) and these are the only decals offered by Tichy. The tiny decal sheets, like the sprues, are disorganized with lots of tiny printed elements. A more logical and modeler-friendly way of printing the decals would have been to print decals as single units that fit the vertical panels between each rib on the car, rather that two to four separate decals per panel. The way Tichy printed them does minimize the carrier film and thus the possibility of unsightly silvering, but that’s a problem that can be overcome with proper blotting and application of decal setting products. As the decals are, they must be carefully aligned individually. Indeed, the Tichy decals are very responsive to Micro Set (under the decal, or between the decal and the model) and Micro Sol (over the decal). After the decals settled in and dried, they were sealed with another coat of Aquagloss in preparation for final weathering.
Further weathering consisted of a pinwash, dot filtering, and dry brushing effects.
For the pinwash, I used AK enamel Dark Wash, applied with a special wash pen for precise application on seams, joints, rivets and other details. Once the Dark Wash was nominally dry, tide marks and build up of excess wash were blended with a rubber blending stump, sometimes helped along a #1 brush moistened with turpenoid, The cars were set aside to dry and off-gas for several days.
Dot filtering is at first hair-raising but ultimately key to adding more patina and tonal variation to simulate a weathered look. A pointy tooth pick dipped in oil paint was used to place tiny dots of raw oil paints all over the car. Red, yellow, dust (a light warm gray, an Abt 502 color), and starship filth (Abt 502’s burnt umber look-alike) oil paints were used. The key is small dots and lots of them. A flat brush moistened with turpenoid is then used to blend in the dots, taking care to to brush in vertical strokes perpendicular to the ground on vertical surfaces, and in horizontal strokes forward and backward on horizontal, top surfaces. The idea is to create the visual hints of rain, dust, bird droppings, and other runoff and paint deterioration on the car. It starts of disastrous looking, and then looks better and better with more blending.
The final step is dust and grime effects, concentrating on the lower third or so cars, including the trucks. I dry brushed Abt 502 light earth and dust oils on the trucks, under frames, lower car sides, and couplers. The cars were set aside for several weeks before applying a final coat of clear flat that provides both protection, and a unifying dull sheen to the cars.
I enjoyed building Tichy’s ore cars, and particularly applying my scale-modeling centric finishing techniques to them. I enjoyed these so much that I have since acquired examples of most of Tichy’s other HO rolling stock and corresponding decals, with the goal of building more in the near future.
Enjoyment notwithstanding, Tichy would do well to improve the presentation of these kits to appeal as crossover opportunities for scale modelers who would like to dabble in some model railroading. First, the decals should be included with the kits. Second, Tichy should develop better, more logical, and better printed instructions that prescribe a build order, provide better positioning information for parts that don’t have keying or other built-in indications for alignment, and recommend paint that is obtainable by most modelers.
Watch this space for another Tichy kit review shortly…

Leave a comment